africa

Wild Dog Safari 2022

Wild Dog Safari 2022 , a conservation safari

2022, November 4 – 14 *6 SPACES AVAILABLE!

Join well known animal behaviour expert Professor Peter Neville and Africa specialist and safari guide Andrew Rae on this veterinary safari in the Living Desert of Namibia.

2 Nights – Namib Desert Lodge

Be awed at the beauty and vastness of the Namibrand. Sip sundowners while watching herds of Oryx come down to drink, the silence broken only by the calls of the barking Gecko .

Wander the ancient dunes of Sossusvlei and the Namib Sand Sea, A UNESCO World Heritage Site.

With a picnic breakfast packed we head north to the UNESCO World Heritage Site of Sossusvlei to ogle at the highest sand dunes on earth. Here we spend the morning exploring Sossusvlei and Deadvlei.

2 Nights – Swakopmund Sands

After breakfast, we take a private flight over the vast Namib dune sea en route to Swakopmund on the Atlantic seaboard.

We arrive in Walvis bay where we will be met with 4×4 vehicles that will drive us between the dunes and the sea to the isolated and exceptionally beautiful Sandwich Harbour where we will have a late lunch.

After the Sandwich Harbour excursion we head north to Swakopmund where we will check into our accommodation, we will go and explore the town of Swakopmund by foot and have dinner at the famous Brauhaus restaurant for German beer tasting and your choice on their delicious menu.

The following morning we will be collected at 8am after breakfast and head out into the Dorob National Park to be introduced to some of the fascinating, hidden life of the Namib Desert. You will be meeting denizens of the desert such as the famous Sidewinder snake, the Palmato Gecko and the large Namaqua Chameleon. We return to Swakopmund for lunch and then the afternoons activities are optional.

Optional; Activities for the afternoon are as follows:

Afternoon of leisure; explore Swakopmund on foot, admire the German architecture and do some gift shopping;
An hours scenic flight over the Dorob National Park;
Sundowners on the beach at Tiger Reef before heading off to dinner.

2 Nights – Mowani Mountain Camp

We spend two nights in this magnificent rock-scape at the award winning Mowani Mountain Camp.

We will spend our days discovering the ancient Bushman engravings at Twyfelfontein and tracking the free roaming desert elephants of the region.

1 Night – Sophienhof (Rare & Endangered Species Trust) 3 Nights at N/a’ankusê including vet work and activities.

Our last four nights are veterinary focused and include hands on work at REST concentrating on endangered species conservation and N/a’ankusê where will assist the on site wildlife vets with carnivore health checks and herbivore work.

Click the link below for more information regarding Registration. This is not a VETS, Inc trip, but VETS has traveled with Rae Safaris, and they do an amazing job!!!

VETS Adventure Series Visits Rwanda

arton1550.jpg

     In July 2018, twenty Adventurers (veterinarians + family members) visited Rwanda to track and observe the Mountain Gorillas.  The VETS Adventure Travelers flew from across the USA into Kigali- the capital city of Rwanda. From there, we were shuttled (2 1/2 hour drive) by Primate Safaris to the Sabyinyo Silverback Lodge in Volcanoes National Park.

     The Sabyinyo Silverback Lodge is lovely. The rooms were excellent with comfortable beds and nice bathrooms.  Each room had a magnificent view of the Volcanoes National Park. The food was amazing and there were plenty of outstanding African wines to enjoy with dinner.

     The Sabyinyo Staff was friendly and helpful. The parking lot is at the base of the facility and it was a little bit of an uphill walk to the lodge-- at 9,000 feet-- so those of us not acclimated to the high altitude were quickly winded and appreciated that the Staff would carry our bags and backpacks for us!

Here's the view out our window at Sabyinyo

Here's the view out our window at Sabyinyo

There are about 170 gorillas in the park. They are social animals that live in groups generally composed of a dominant male and up to five or more females and their young. Each gorilla group is continually foraging for food.  Their food consists mainly of leaves, buds, tubers and wild celery.

Trackers went out in front of our group to locate the gorillas and our Guides communicated with the Trackers to lead us right to the gorillas. Well, there actually was some hiking through the jungle (~9,000 ft above sea level) before we actually got to see the gorillas!

IMG_7582.jpg
IMG_7584.jpg

Once we arrived at the gorilla group, we were allowed one hour of 'viewing time.'In this video, you can see the gorillas tumbling around like a couple of unruly kittens.

We had the opportunity to "track and trek" a different group of gorillas on the second day.   

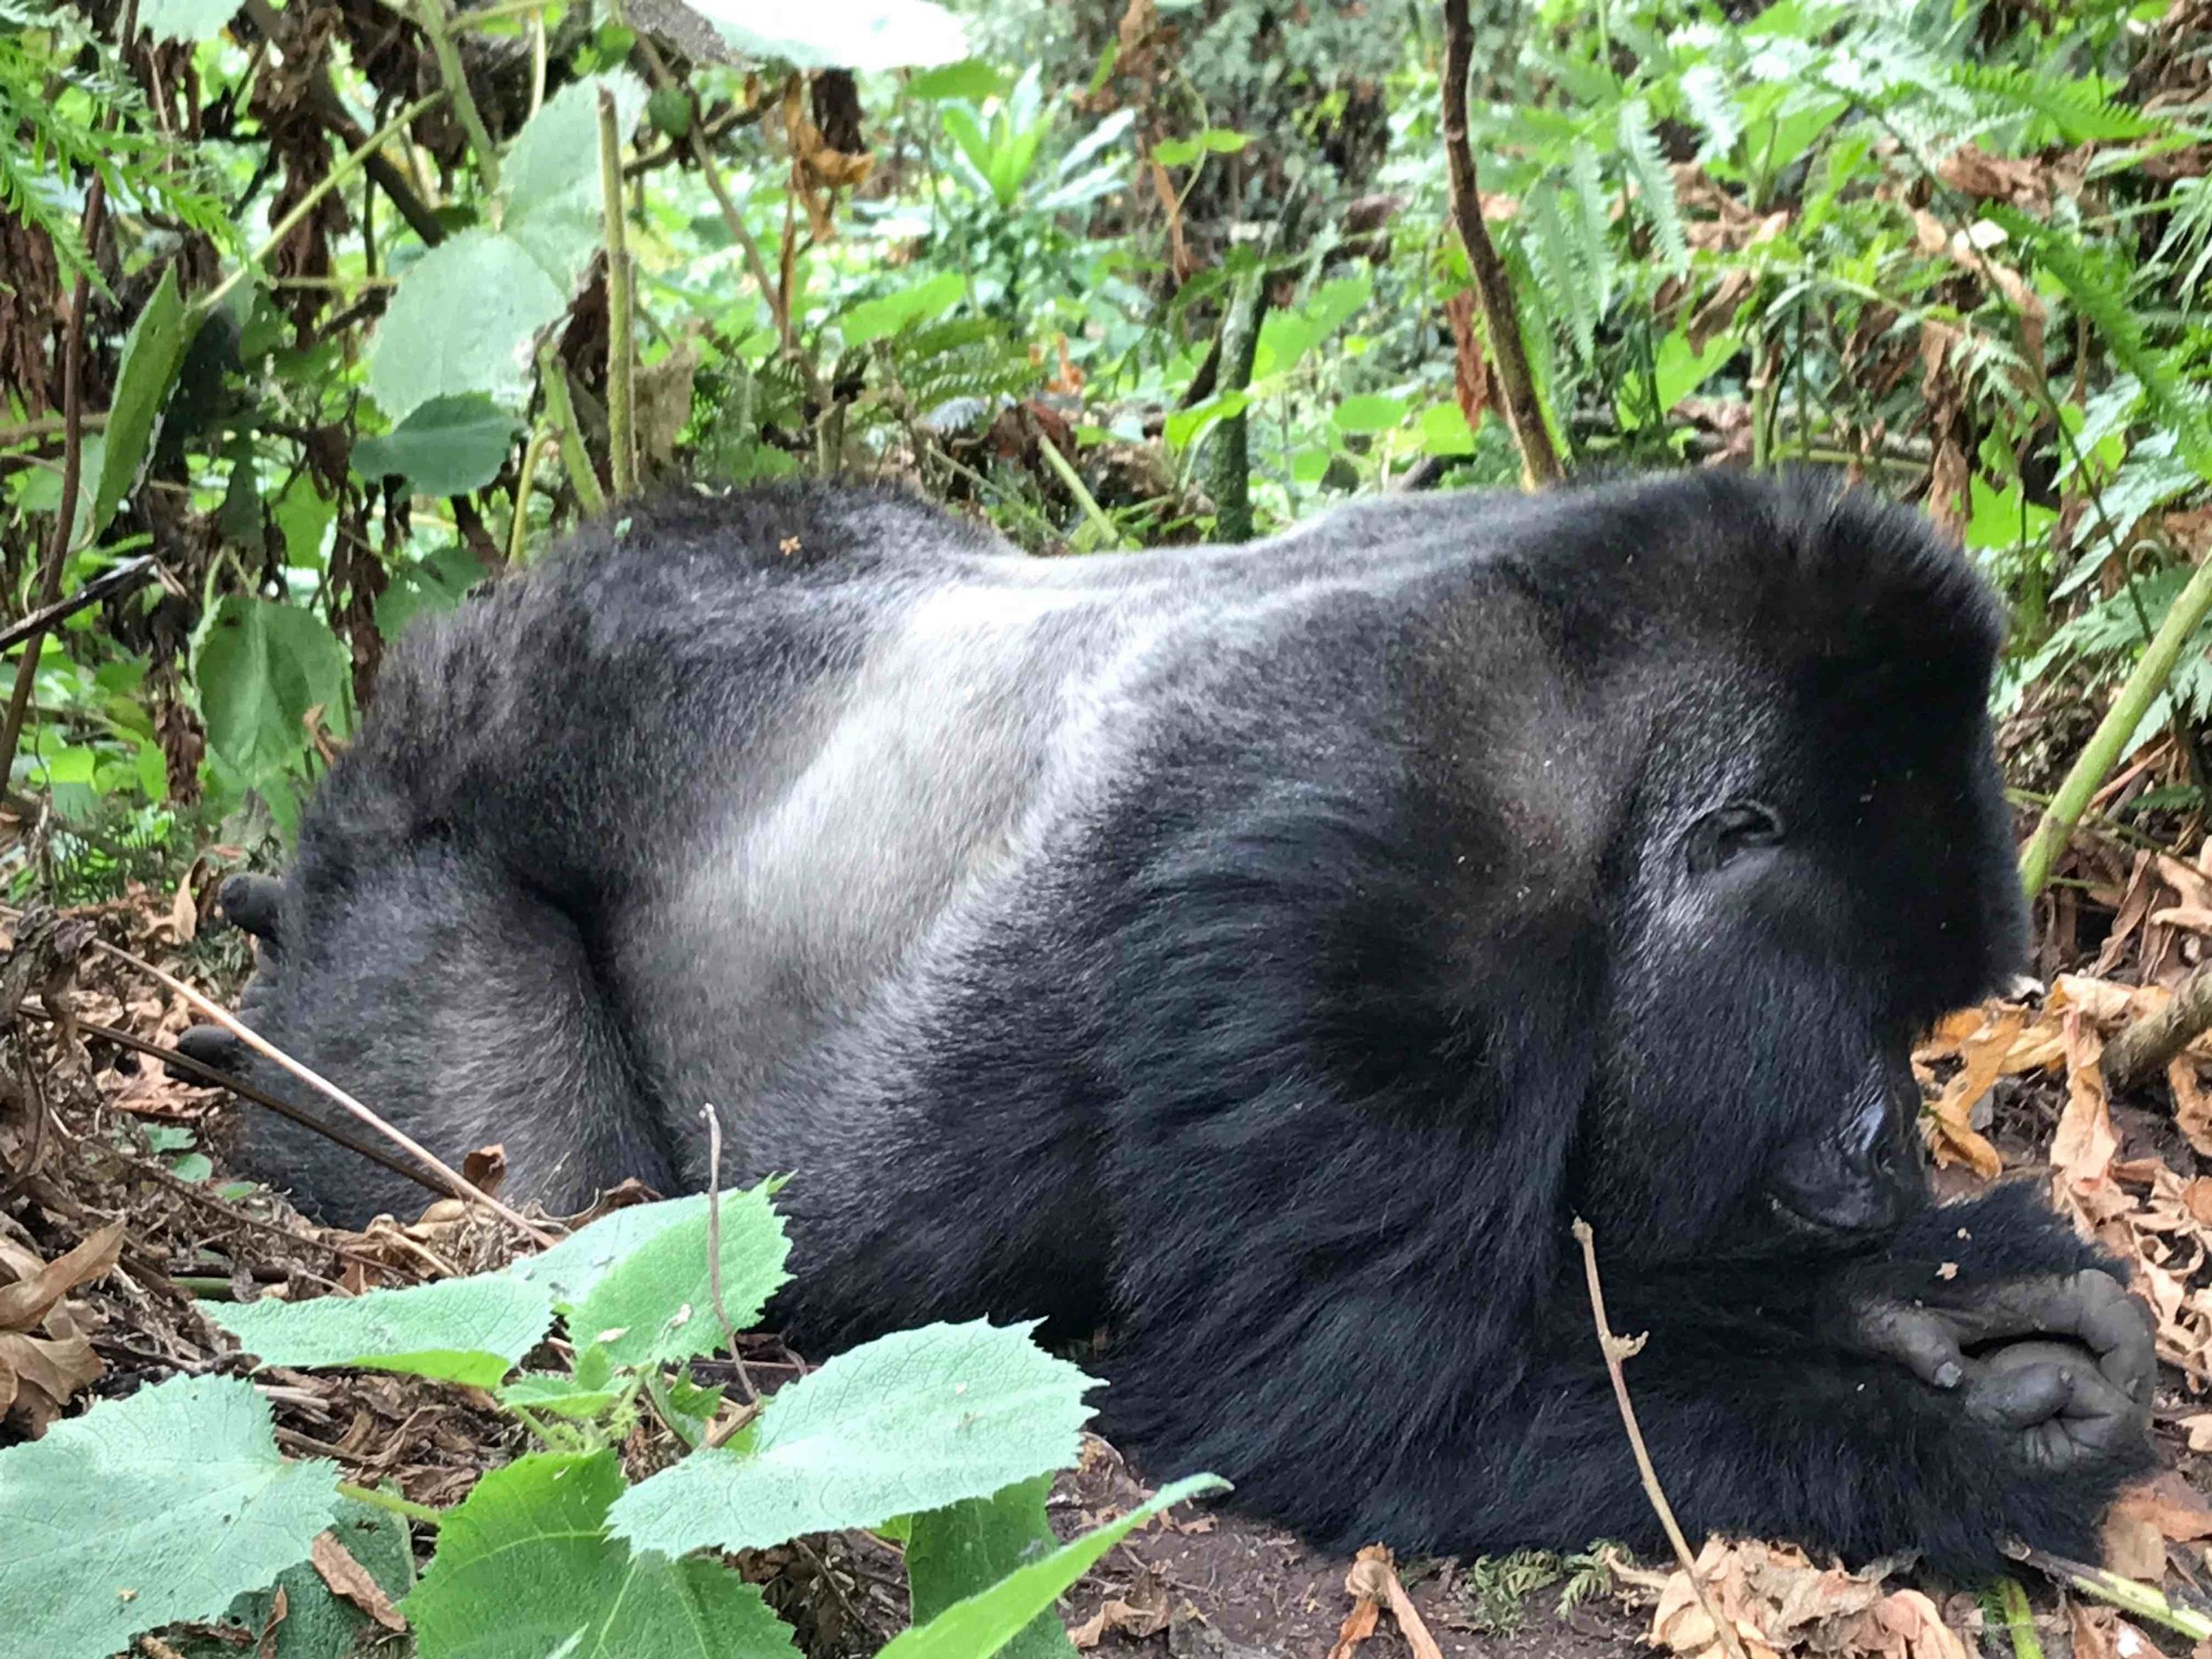
Every gorilla family is different, just like every human family.  Our second group of gorillas has a dominant silverback and a subordinate silverback. Here is the subordinate in deep thought . . .

beta.jpg

This young 'blackback' gave us some excitement when he jumped out of the brush and chased another juvenile along our path. We always tried to maintain a 7 meter distance from the gorillas, but they didn't always follow that rule!  After his game of 'tag' with the other gorilla, he decided to sit down along our trail and strike a pose.

gorilla.jpg

The trek to find the gorillas ranged from about one hour in the jungle up to 3 hours (plus drive time.)  Once we found the gorillas, there is a one hour limit on the visitation.  Though we were sorry to see our hour come to an end, we understood that the gorillas had important things like foraging and playing to do and we bid them 'farewell' with smiles on our faces.

The VETS Adventurers at the conclusion of our second Gorilla Trek!

The VETS Adventurers at the conclusion of our second Gorilla Trek!


For more information about the veterinary-related trips and continuing education that we offer, go to eduvets.com!  


Binocular Choices for Safari

by Don Klingborg, DVM

Binoculars can be confusing and I recommend you talk with a knowledgeable person to help select the right one for you.  Bev and I think they’re important on wildlife trips and add to the experience considerably.  Prices range considerably and the many choices available are important to match the equipment with your needs and pocketbook. Early in our travels Bev and I tried sharing a single pair, but found we both missed too much.  Now we have our own and while I use the camera more than the binoculars I still find them useful.

Binoc.jpg

Binoculars are essentially two telescopes placed side by side. The large lens at the end is the collection objective and focuses the image while collecting the light (larger = better in poor lighting situations).  There is a prism system housed inside the body of the binocular that flips the image so it will be right side up for the viewer.  The third component in the binocular is the eyepiece objective, which actually provides the magnification.

The two types of binoculars on the market use different prism systems.  The right angle Porro system is the one we envision when we think of binoculars and it creates the traditional jog in the binocular body and takes more space.

The Roof prism system requires more complex technology to manufacture, and is smaller allowing it to be housed in a straight tube body so it is more compact and lighter. The major disadvantage of the Porro system is they result in larger and heavier binoculars.  Porro binoculars are said to provide better contrast and are cheaper.

Binoculars are described using two numbers -- the first number represents the amount of magnification (provided by the eyepiece) and most common choices are from 8X to 15X.  Bev and currently have 10X binoculars but she also loved her 8X set (she wore it out) because it was small and light.  I find 10X to be fine, but if you’re avid birders you may want more magnification).

The second number represents the size of the lens at the far end of the binocular, and is the collecting objective that “captures” light – larger is better in low light situations and is also heavier.  Not a problem on safari’s as you’re riding around, but may be a problem if you’re a hiker.

Bev and I currently each have 10 x 32 (Roof) binoculars from different manufacturers and with different prices 

Regardless of the system you purchase be sure they have special coatings on their lenses to minimize glare and halos of light (I’m told BAK-4 glass is the best but you’ll want to dialogue with someone with more knowledge about this).

Other factors that impact the binocular experience (and pricing) include: resolution (sharpness); brightness; contrast; color accuracy; width of field of view; percentage of the image visible if you wear glasses; ergonomics (fit and feel; weight; and smoothness of focus. 

Resolution is extremely important, with more expensive lenses better at being sharp from edge to edge while less expensive lenses are sharp only in the center of the field of view.  Unfortunately, the resolution of our eyes degenerates with time, suggesting the need for more quality binoculars as we age (the good news is we can give the old cheaper ones to our kids guilt free!  Our kids argue that since our eyes are bad it would be a waste for us to use the good binoculars).

Eye relief is an important issue especially for those of us that wear glasses—8 is reported to be better than 10 and 42 better than 32 for people with glasses (but then I successfully use a 10 x 32 with my glasses). 

Do be sure to get binoculars that can be focused smoothly with one finger.

The latest innovation brings image stabilization to binoculars.  Cost and weight go up, eyestrain goes down and images improve.  Many think it’s most important if you’re magnifying at 12 or higher, but some report benefits as low as 8.  They do require batteries, but they still work (just not as well) if the batteries go dead.  You’ll want to read more on the subject if you’re thinking about it.

Summary


Binocular Size

            Full Size (Common Specs 8 X 42 & 10 X 50)

For serious wildlife viewing and in boats.  Large & considered too heavy for backpacking)


Mid-Size (Common Specs 7 X 35, 10 X 32)

Good all-around choice for wildlife & sports use.  A bit heavy for backpacking, they provide above average light transmission


Compact (Common Specs 8 X 25, 10 X 25)

Best for daytime activities, eye fatigue may be a problem with greater prolonged use


Magnification

The number reflects the increase in size of the subject.  40 feet away will look like it’s 5 feet away with an 8X, and 4 feet away with a 10X


Lens Objective Diameter

The second number used to describe binoculars, this is the diameter in mm of the lens at the front of the binoculars (farthest from your eyes).  The

larger the objective the more light is captured and the brighter is the image, more important at dawn and dusk than midday.

Exit Pupil

This number is an indicator of how bright a subject will appear when viewed in low light situations.  Higher numbers mean brighter subjects.

The number is calculated by dividing your objective (far lens) by the magnification (eyepiece).

A 20 X 32 = 32/10 – 3.2

A 10 X 42 = 42/10 = 4.2 

A 10 X 50 = 50/10 = 5.0

In low light the normal human pupil can dilate up to 7 mm, so if your number is lower than 7 you’re limiting the amount of light available to your eyes.  For night use may select 7 X 35, providing 5.0 exit pupil scores in a lighter and smaller binocular than the 10 X 50 (with a similar exit pupil score.

For those of you wondering, in daylight viewing the human pupil narrow to roughly 2 mm and all binoculars have exit pupil scores larger than 2 mm so no light restriction exists.

Relative Brightness

            Another calculation, this time taking your exit pupil score and squaring it. 

Using the three examples above an exit pupil score of 5 = relative brightness of 25 (5 X 5).  4.2 = 17.6 and 3. 2 = 10.2.  Higher scores are brighter.  Note that manufacturers offer that not all identical scores deliver equal brightness as prism type, lens elements, component quality and optical coatings impact the final experience.

Eye Relief

This is associated with the distance between the eyepiece and your eyes while the whole field of view is visible.  Long eye relief increases comfort by allowing you to hold the binoculars away from your face.  This is most important if you wear glasses.  Those of us wearing glasses should look for eye relief numbers of 11 mm or more.

Field of View

This is the width of the area that you can see at a distance of 1,000 yards from where you’re standing.  Wide fields of view are best as they make it easier to find the critter you want to look at more closely, and to follow animals on the move.  In general, the higher the magnification the less field of view you’ll experience. 

Focus

            Most binoculars offer two ways to focus:

The first is the diopter adjustment on the eyepiece (either left or right) that allows you to compensate for different sight in each eye.  The second is a central turning wheel that alters the vision in both barrels at the same time. 

Type of Prism

This is the element that flips the image so everything you see isn’t upside down.  The Porro vs. Roof systems reflect the two kinds of prisms.

Lens Coatings

When light hits the objective some of the light is reflected away, lowering the amount of light transmission to your eyes and negatively impacting the brightness of the subject.  Added coatings can reduce this reflection and help make the image sharper.

Waterproof/Weather Resistant

Added elements that result in a better seal from water and dust from entering your binocular. It won’t’ make them water proof so dropping them in the river will still be bad, but they do help in rain/moist situations.

Fog Proofing

Moving binoculars from cold to warm conditions, or vice versa, (just like camera lenses), may result in moisture consolidating within or on the outside of the lens.  Some binoculars replace the air in the binocular with inert gas that has no moisture content so there is nothing to condense inside. You’re still responsible for keeping the outside of the lens free from moisture/dust.


Camera Advice When Traveling to Africa for Safari

by Don Klingborg, DVM

If you are bringing many cameras, you may be held at customs due to concerns that you may be selling them.    Do have several copies of a record with the model and serial number of your camera and lenses.  I do not expect one (or two) camera bodies and several lenses per person to raise any concerns.

Digital or film?  This is more an individual preference.  In the past I used film with great results and satisfaction.  I loved the ability to have very high ASA speeds for mornings and dusk, and to “freeze” the critters as they moved.  I’ve now fallen in love with digital photography and no longer use film. The biggest challenges I’ve found with digital are (1) being sure you’re shooting with sufficient speed to freeze movement and (2) overcoming the delay inherent in many (older or less expensive) digital cameras from the time you push the button to when exposure actually happens.  The perfect photo can be missed due to this delay.  I’ve learned to compensate by shooting multiple exposures (and reviewing them in the evenings discarding those that “missed”) and by replacing older camera’s with newer and better equipment with faster components.  This is more of a problem in Africa than on the Galapagos Islands as animals run from you in Africa, and simply don’t notice your presence on the Islands (no fear of humans for most, but the crabs will avoid you).  My photos are better in the Galapagos because I get the front end of the critters, in Africa more of the rear end as they’re running away.

I bring additional image storage devices because I shoot at higher megapixels and need space.  Remember to bring extra batteries for the trip (which are hard to come by and may be expensive).  I don’t erase photos from memory when I upload to the computer so I have two files should one have a problem. I’ve successfully charged cameras overnight and most cameras can use either 110 V or 220 V.  You’ll need the right adaptors for the country being visited.   Be prepared the number of outlets may be limited – I have a small three plug travel strip that allows me to charge the camera and Bev to curl her hair – a very wise investment.

Do “shoot” carefully—film is expensive to buy and limited in their ASA selections.  Be aware that the airport security screening X-ray equipment is not as regulated in South America or Africa as it is in the US and I’ve heard reports of priceless negatives being ruined by X-ray.  I had no problems using an inexpensive lead-lined film bag for my regular film, and made sure I had it in my carry-on and not packed with the luggage being checked.  I prefer to carry my memory storage devices in carry-on—and if in checked luggage I spread them between Bev’s and mine should one be ‘lost’.

Lenses do most of the work in good photography.  Recall that the better digital cameras use the same lenses used with film cameras, but the digital sensor that captures the image in many (not all) digital cameras increase the magnification by about 1.6X that found with film.  These means a 300 mm lens is more like a 480mm lens.  I’ve recently switched back to a full frame sensor camera from my less than full frame camera and expect I’ll shoot either panorama (down around 16 mm), most often with a 70-300mm lens, and if birding with a 100-400mm lens. With image stabilization even at 300 mm you usually don’t need a tripod. I’ll likely be the one spending all his time changing lenses and not getting any pictures.